The Preferences window lets you customize several of EchoLink's features to suit your own taste. Choose one of the tabs along the top to view the Listing, Connections, Security, and Signals options. Each of these tabs is described in detail below.
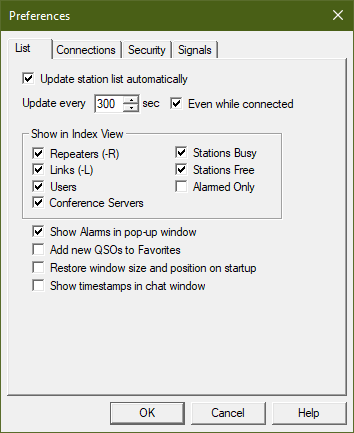
Items on the Listing tab control options for the station list area at the center of the EchoLink screen. This portion of the screen shows the callsign and location of each station currently on the system, and whether each is Busy (already in contact with another station) or On (ready for a new contact). For more information about the Station List area, see Station List.
Update station list automatically: If this box is checked, the station list will refresh itself periodically. The box below it specifies the number of seconds between each refresh.
Even while connected: If this box is checked, the automatic refresh will occur even while you are in contact with another station. On slower Internet connections, this may interfere with smooth performance of the audio, so you may wish to un-check it. If the box is un-checked, EchoLink will refresh the station list as soon as your contact is complete, unless less than 30 seconds has elapsed since the last refresh.
Show in Index View: This set of check boxes specifies which types of stations you wish to include in the Index View. Un-check any types of stations you do not wish to see. For example, if Stations Free is checked but Stations Busy is not, any station currently in contact with another will be omitted from the list.
Alarmed Only : If this box is checked, only those stations which have been added to your Alarms list will be displayed. For more information, see Tools Menu.
Show Alarms in pop-up window: If this box is checked, the Alarm Log window will automatically open each time an Alarmed station changes status, showing the station's callsign and status. You can also open or close the Alarm Log window from the View menu.
Add New QSOs to Favorites: If this box is checked, EchoLink will automatically add any stations to which you connect (or which connect to you) to your list of Favorites. (Favorites is one of the folders in the Explorer View). This is a convenient way of quickly re-connecting to a station you have spoken with recently.
Restore window size and position on startup: If this box is checked, EchoLink (on startup) will restore the main program window to the size and position at which you left it when it was last shut down. Otherwise, EchoLink always starts the program with the default size and position. If you should ever wish to return EchoLink to its default window sizes, un-check this option and restart the application.
Show timestamps in chat window: Check this box to prepend each incoming text-chat message with an extra line showing the current local time.
The Connections tab includes controls for setting up the Conferencing features of EchoLink, and for setting text messages that appear during a contact.
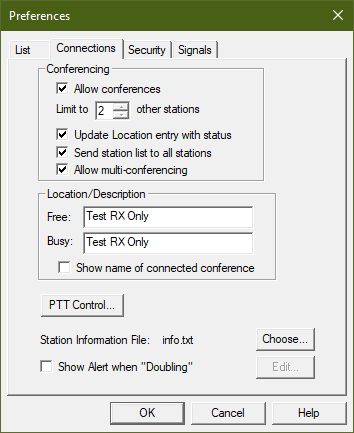
Allow conferences: Check this box if you wish to allow more than one other station to connect to your EchoLink software at a time. In the box beneath, enter the maximum number of stations you wish to allow at once (not including yourself), to a maximum of 99.
For more information about conferencing, see Conferencing.
Update Location entry with status: If this box is checked, EchoLink will automatically update your station's entry in the Station List with a notation about the number of stations which have joined the conference. This allows other stations (who have not yet joined) to see the status of your conference. The notation is a number, in parentheses, added to the end of your Location/Description entry. Note that your station will be listed as On (rather than Busy) as long as the maximum number of connected stations has not yet been reached.
Send station list to all stations: If this box is checked, EchoLink will periodically update the text screen of each connected station with a list of all stations in the conference, with an arrow indicating the station that is currently speaking. This takes the place of the Station Information file, if one had been configured. This list will also appear on your own screen, even if this option is not selected.
Allow multiconferencing: Check this box to allow a conference hosted on your PC to be connected to one or more other conferences. (By default, this type of connection -- known as multi-conferencing -- is inhibited by the software). See Conferencing for more information.
Location/Description: The text in these two boxes will be displayed next your station's callsign in the Station List that is viewable by all stations on the system. Different text may be specified depending upon whether your station is Free (not in conversation) or Busy. Normally, however, these two items are the same.
Show name of connected conference: When this box is checked, each time you connect to a conference, EchoLink will automatically update your Location listing with the name of the conference, instead of your usual Location/Description. The listing (that other stations see) will become "In Conference XXXXX", where XXXXX is the callsign of the conference server or EchoLink conference you are connected to. (Note that this information will not appear in your own Station List until the next refresh.)
PTT Control: Choose this button to open the PTT Options window, which has the following options:
Keyboard Key: Check this box, and choose the keyboard key to be used, if you wish to control the TX from the computer's keyboard. The choices are as follows:
Space Bar
Left Ctrl Key (the Ctrl key at the lower-left corner of the keyboard)
Right Ctrl Key (the Ctrl key to the right of the space bar)
Num Pad Plus (the + key on the far right-hand edge of the keyboard)
Num Pad Enter (the Enter key on the far lower-right corner of the keyboard)You can choose between two options for how this key behaves as a TX control. When the Momentary box is not checked (the default), tapping the key once will switch to TX, and tapping it again will switch out. When Momentary is checked, press and hold the key to TX, and release it to stop, like a conventional push-to-talk switch.
Note that the key you select for TX cannot also be used for its normal purpose. For example, if you select Left Ctrl Key, the left-hand Ctrl key cannot be used to invoke Ctrl commands, such as Ctrl-V. However, if Space Bar is selected, the space bar can still be used to create space characters in the Text Chat window.
Normally, the selected key will activate TX only when EchoLink has "focus", that is, when EchoLink is the topmost, active application on your Windows desktop. However, if you check the System-Wide box, the key will activate TX even when EchoLink is minimized or not activated. This is convenient if you wish to use other Windows programs while you are in an EchoLink QSO. (The System-Wide option is not available if Space Bar is the selected key.)
Serial Port CTS: Check this box, and choose the serial port to be used, if you wish to control the TX using a push-to-talk switch connected to the computer's serial port CTS pin. This is typically used for connecting a footswitch or push-to-talk switch to the PC for EchoLink operation.
Active Low: Inverts the sense of the CTS pin, so that TX is activated when the CTS pin goes low.
Middle Mouse Button: If you are using a three-button mouse (or a mouse with a clickable wheel), check this option to use the middle mouse button as a TX control as an alternative to the space bar. This option is not available if Windows does not detect a three-button mouse.
Station Information File: EchoLink sends a text message to the other station when you establish a connection, which appears on the other station's screen. By default, this message is "Station XYZ", where XYZ is your callsign. Choose "Edit..." to make changes to this message, or choose "Choose..." to select some other file (besides info.txt) as your Station Information File.
If "Edit..." is grayed out (not available), it means the station information file hasn't yet been created, or has been deleted. You can use Windows Notepad to create one, then click "Choose..." to locate it so it can be used by EchoLink.
Show Alert when "Doubling": Normally, EchoLink does not allow two stations to transmit at the same time. However, due to Internet latency, it is possible for two stations to double if they begin transmitting at exactly the same moment. Enable this option to display a warning message in the Chat window if you are doubling with another station.
The Security tab controls features which prevent undesired access to your EchoLink system. This is particularly of interest in the Sysop mode, although the Security settings work in either mode.
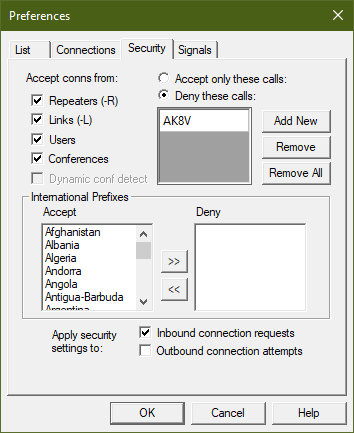
Allow connections with: These four checkboxes control which types of stations you are willing to connect with. If a station that has been excluded tries to connect, EchoLink will immediately deny access, and make a special notation in the Log file.
Note: Un-checking "Conferences" will block connections only with "conference servers", and conferences running EchoLink.
If Conferences is un-checked, EchoLink will not allow connections with conference servers or EchoLink conferences. It is possible, however, to be connected with a station which later becomes a conference (when it connects with a third station). In this case, EchoLink will immediately disconnect, but only if Dynamic conf detect is checked.
Deny these calls: Select this option to set up a "banned list" of stations with which you do not want to connect. Any number of callsigns may be entered. To add a new callsign, choose Add New, then type the callsign (including any -L or -R suffix) into the blank space provided. To remove a callsign, select the callsign and choose Remove. Choose Remove All to clear all callsigns from the list. If the list is empty, no connections will be denied based on callsign.
Accept only these calls: Select this option to set up an "approved list" of stations with which you wish to allow connections exclusively. If this option is selected, no connection will be established with a station whose callsign is not listed. As with the Deny function, all callsigns must be fully spelled out, including any -L or -R suffix.
Note: Instead of (or in addition to) callsigns, you can also enter IP address ranges in this list, in CIDR notation. This is sometimes useful as a short-cut for accepting or denying several different stations who use the same Internet provider.
International Prefixes: Use this feature to control access to your station according to the international prefix of the other station's callsign. For convenience, EchoLink manages these prefixes internally, and displays only the names of each country in these lists. This feature has been provided to help you comply with your country's rules regarding reciprocal control-operator privileges or third-party traffic restrictions.
The countries in the Accept list are countries with which connections will be allowed; those in the Deny list will be denied. To move a country from one list to the other, select the country name (by clicking on it), then choose one of the two arrow buttons in the center.
For example, if the only country in the Deny list is "United States", any station with a U.S. callsign prefix (AAA-ALZ, KAA-KZZ, NAA-NZZ, or WAA-WZZ) will be denied access; all others will be allowed.
Note that the countries listed are those in the ITU Prefix list. There is no recognition of DXCC entities for this feature, and thus no distinction between offshore territories and their host nations. Also, EchoLink has no way to detect when a callsign is being used outside of its country of origin.
Apply Security settings to: Use these two checkboxes to direct EchoLink to apply the above security settings to connections coming in to your station, to connections initiated by your station, to both, or to neither. For example, if both boxes are un-checked, the Security settings have no effect, and all connections are permitted.
The Signals tab lets you change the sounds (signals) produced by EchoLink when certain events occur. EchoLink includes a set of default sounds, and you can silence them or substitute your own WAV files for each. These settings apply to Single-User mode only.
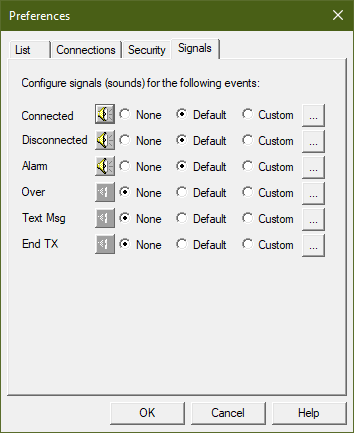
The signals are as follows:
To preview any of the signals, click on the small loudspeaker button. The corresponding signal will be heard from the PC speakers.
If your computer has multiple sound cards, note that signals (in single-user mode) are always played through the Windows default sound device, regardless of the settings on the Audio tab of Setup.
These signals are used only in Single-User mode. In Sysop mode, a separate set of signals is used. For more information, see Signals.