Setup allows you to set basic features of EchoLink. Choose one of the tabs along the top to view the MyStation, Servers, Timing, and Audio options. Each of these tabs is described in detail below.
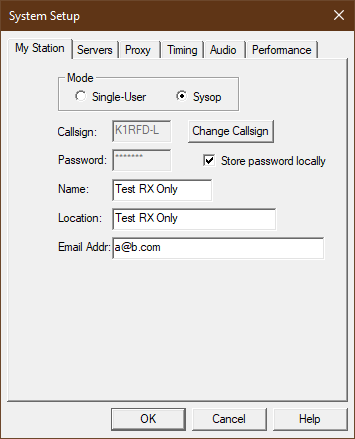
The MyStation Tab configures the system mode, callsign, and other information about your station.
Mode: Choose the appropriate mode for EchoLink. The following modes are available:
For a complete description of each mode, see Modes.
Callsign: Set the callsign exactly as you wish to be registered. If you have already registered, use the same callsign you used previously. The callsign must be at least 3 characters long and may not contain spaces or punctuation, except as part of an -L or -R suffix.
If you have selected Sysop mode, put an -L or -R at the end of your call, to indicate a "repeater" or "link", respectively (for example, K1RFD-L). Use -L if the link is tuned to a simplex frequency or -R if the link is tuned to the frequency pair of a local repeater.
If you have selected Single-User mode, do not use a suffix after your callsign.
Password: If you have registered previously with EchoLink, type your original password here. Otherwise, select a password you can easily remember, and it will be assigned to you as you register. Once established, you cannot select a new password using EchoLink, but if you realize you had entered it incorrectly, you can re-enter it after choosing Change Callsign.
For protection against casual glances, the password is shown only as a series of asterisks.
Store password locally: Leave this box checked if you want EchoLink to store your password on the PC (encrypted). This will allow EchoLink to log on automatically each time the program is started. If your PC is used by others, you may want to un-check this box. If this box is not checked, EchoLink will prompt you for the password each time the program is started.
Change Callsign: As a precaution against inadvertent changes, you cannot enter a different callsign or password without first choosing Change Callsign. Note that if you are connected to another station, you will be disconnected when you change callsigns.
Name: Enter your first name here. This name will appear on the other station's screen when you establish a contact.
Location: Enter the location of your station, or a description of its function. This will appear in the list of available users. Examples: "Ridgefield, CT", or "Link to W2ABC/R, NYC".
Email Addr: Enter your e-mail address. This is used only during initial registration.
The Servers tab configures the connection between EchoLink and one or more Registration Servers. Registration servers maintain information about which stations are registered, and which are currently on the system. Normally, this information does not need to be changed.
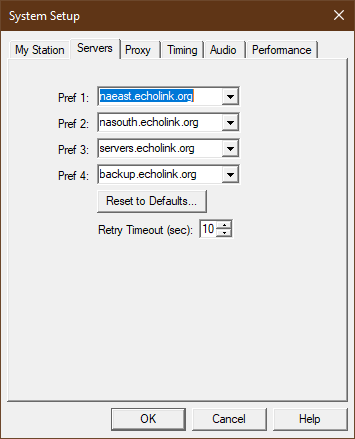
Pref 1 through Pref 4: Shows each of the server names (or addresses), in order of preference. If the server at Pref 1 cannot be contacted, the server at Pref 2 will be tried, and so on down to Pref 4.
Reset to Defaults: If you had found it necessary to change any of servers in the list, choose this option to restore the original settings. You will be asked to indicate in which region of the world you are located. This information is used by EchoLink to select the best combination of servers closest to you.
Retry Timeout (sec): Specifies the number of seconds EchoLink will wait while trying to contact each of the servers on the list. If the time expires without success, EchoLink moves to the next server on the list. The default is 10 seconds.
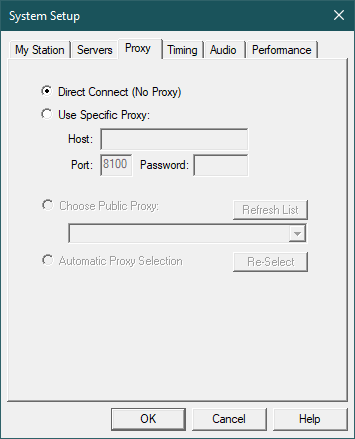
The Proxy tab sets options related to EchoLink Proxy servers. A Proxy is a convenience for EchoLink users who are behind restrictive routers or firewalls, such as public Wi-Fi "hotspots" or other shared public networks.
An EchoLink Proxy can be set up either as public or private. Private proxies are generally for the benefit of one specific user, wherease public proxies are offered for use by any EchoLink user who needs it.
For details on the EchoLink Proxy system, please see the Proxy page on the EchoLink Web site.
The Public Proxy and Automatic Proxy options are not available if EchoLink is running in Sysop mode.
When using a public proxy, please be aware that public proxies are scarce, shared resources. Priority should be given to EchoLink users operating in restricted public networks. If you are operating EchoLink at home and experiencing firewall-related problems, please try to troubleshoot the problem rather than using a public proxy. Direct Connect uses less Internet bandwidth and is typically more reliable. You may also be able to use a commercially-avalable VPN service instead of a proxy.
The Timing tab configures several of EchoLink's time-out timers. Limiting the time allotted to certain features helps assure smooth operation of EchoLink and other stations on the system.
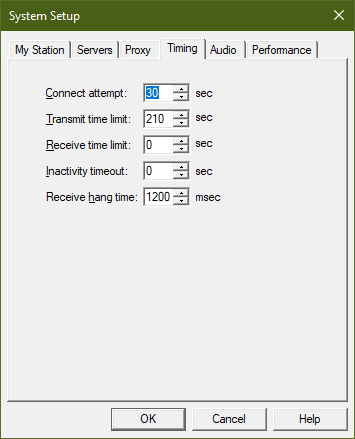
Connect Attempt: Specifies how long EchoLink will try to establish a connection with another station. If there is no response from the other station by this time, EchoLink cancels the request. The default is 30 seconds.
Transmit Time Limit: Specifies how long EchoLink will allow a single transmission (from this computer to another station on the Internet) to be. If the time limit is approaching, a special warning message appears near the bottom of the screen. If the limit is exceeded, EchoLink automatically stops transmitting. The default is 210 seconds. Enter 0 to configure no such time limit.
Receive Time Limit: Specified how long EchoLink will allow another station's transmission (from the Internet to this computer) to be. If the limit is exceeded, EchoLink automatically disconnects the other station. Enter 0 (the default) to configure no such time limit.
Inactivity Timeout: Specifies how long EchoLink will allow a connection to remain connected if neither station is making a transmission. If the time limit is exceeded, EchoLink automatically disconnects. Enter 0 to specify no such time limit, which is the default.
Receive Hang Time: Specifies how long EchoLink remains in "receive" mode after the remote station has stopped sending. This value is specified in milliseconds (1 second = 1000 ms). The default is 1200 ms, or 1.2 seconds. This value should rarely be changed.
The Audio tab lets you specify which of your PC's sound cards to use, and select certain other audio-related options.
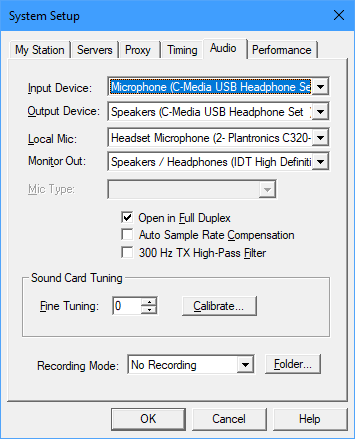
Input Device and Output Device : Specifies the sound card(s) or device(s) EchoLink should use for its audio. This is useful when EchoLink is used on a PC with more than one sound card installed. In most cases, the [system default] setting is appropriate for both items; when this choice is selected, EchoLink will use the Record and Playback sound devices that have been set up in your Windows Control Panel.
Local Mic and Monitor Out: These options are available only in Sysop mode, and only when a second sound "card" is installed.
Note that the choices in the Input Device list may include two or more input jacks on the same sound device. For example, if you have a sound card with a Microphone input and a Line input, you may see these two choices listed as though they were separate devices.
Note: In Single-User mode, signals are always played using the Windows default playback device, irrespective of these settings. See Signals.
Mic Type: If you are running in Single-User mode, choose the type of microphone you have connected to your PC. The choices are Communications Mic and General-Purpose Mic. The default setting is Communications Mic, which applies no shaping to the microphone audio. However, if you are using a general-purpose mic with a flat response, you might be able to improve intelligibility by choosing General-Purpose Mic, which adds a "boost" in the upper and midrange frequencies, to mimic the response of a communications-type mic. Note that this setting has no effect on audio received from other stations over the Internet, nor does it have any effect in Sysop mode.
Open in Full Duplex: This option should normally be enabled. However do not check this box if your computer uses a "half duplex" sound card or driver.
Auto Sample Rate Compensation: Check this box to allow EchoLink to compensate automatically for variations among sound cards. Some sound cards may operate as much as 2% away from the desired sample rate, which can cause periodic gaps in received audio, even over a perfect Internet connection. When this feature is enabled, EchoLink detects this problem and inserts or removes packets to compensate for it dynamically. You might perceive this compensation as a slight skip or echo periodically.
300 Hz High-Pass Filter: Check this box to invoke a software-based DSP filter which rolls off outbound audio below 300 Hz. This is often useful to remove bassiness and various pops and "booms" from your audio, particularly if you are using a PC-style or general-purpose microphone. This can also be used to filter out PL tones from a local RF signal in Sysop mode, if your receiver does not roll off audio below 300 Hz. This filter does not affect incoming audio (audio received over the Internet).
Save and Restore Level Settings: (Sysop mode only.) When checked, EchoLink will keep track of each of the input and output audio level controls, and on startup, return them to the positions to which they had been set during the previous run of EchoLink.
Fine Tuning: Adjusts the sampling rate of your computer's sound device. For best results, EchoLink requires that the sound device run at 8000 Hz. However, some sound cards are significantly off-frequency, which can cause periodic audio drop-outs. If you suspect this is the case, the sound card can usually be forced to run slightly faster by choosing a positive Fine Tuning amount, or slower by choosing a negative amount. However, please note that some sound cards do not allow this setting to be adjusted, in which case this adjustment will have no effect.
Calibrate: Choose Calibrate to have EchoLink automatically estimate the appropriate Fine Tuning amount by comparing the sound card's sample rate to the computer's high-resolution timer. However, note that this estimate is not always accurate, due to the effects of other applications running on your system. If in doubt, choose 0 as the Fine Tuning amount, which is the default.
Recording Mode: Enables or disables the auto-recording feature, and when enabled, specifies the recording mode. See the Record and Playback for more information.
Folder: Click this button to choose the folder in which EchoLink should save the audio files it records. This folder will also be the default folder for locating Playback files. By default, this is a subfolder called "wav" in the subfolder in which the EchoLink program file is installed.
Note: You can choose Adjust Volume from the Tools menu to adjust the Playback or Recording audio levels. For more information, see Sound Card Adjustment .
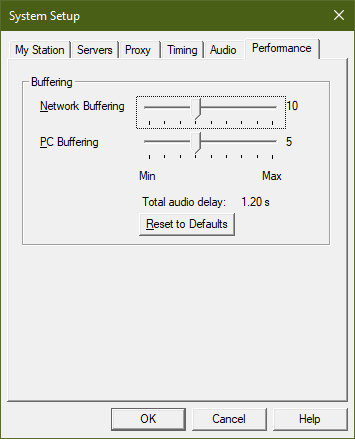
The Performance tab lets you make adjustments to compensate for a slow computer or slow (or fast) Internet connection.
Network Buffering: Controls how much data EchoLink will accept from the Internet before it begins to play it. This technique is known as "buffering", and helps ensure that incoming audio does not sound choppy due to variations in the timing of the Internet. Moving the slider to the right (for more buffering) may produce smoother audio on your system if you are connected to the Internet over a slow link. However, the further the slider is moved to the right, the longer the delay.
PC Buffering: Controls how much data EchoLink will send to your PC's sound card at once. As with Network Buffering, this technique helps ensure smooth-sounding audio. If your PC is an older machine, or is running other tasks at the same time (particularly if there is a lot of hard-disk access), you may get smoother performance by moving the slider to the right.
The illustration above shows the default positions of these two sliders, which is recommended for normal operation.
Total Audio Delay: Displays the estimated delay between the moment the remote station speaks to the moment you hear the sound from your speakers. This value is updated automatically as you move the Network Buffering and PC Buffering sliders, so you can see the total effect.
Reset to Defaults: Returns the Network Buffering and PC Buffering sliders to their default positions.